Proactivity

Progressive Thoughts


  • Startseite

  • Archiv

  • Tags
Proactivity

Why technologies evolve and technologists dissolve

Veröffentlicht am 2016-11-27

Source

I started on Swing applications, and used to enjoy it. I enjoyed building a clumsy desktop app, which could barely compete with a much faster, much lighter native application already installed on my system. still I saw value in doing something, which was futile. but still felt joyous, because I was doing it. The period until when I was feeling wonderful about that futile act was wasted, and i was dissolving until I picked up something that was evolving (happened to be enterprise app development with java). which followed similar cycle. Overall what I realized was that. technologies do and will continue to evolve always. However, the injection of technologists’ ego (of knowing something) is what is the difference between evolving or dissolving :-)

So don’t dissolve, evolve with the whirlwind of changes surrounding you.
Proactivity

Dockerize your Wordpress setup

Veröffentlicht am 2016-11-27

Source

This is a super short tutorial on how to get your wordpress setup running in a snap.

Things we need - a linux system in cloud(i chose ubuntu) with internet connectivity and ideally a domain name you have purchased

Step 1 : connect your cloud instance of linux to your domain. a super tutorial digitalocean, aws .Other setups are similar. check their help. Very soon - your domainname will start to point to an ugly page saying ‘page not found’. this is your success point (most likely)

Step 2 : ssh into your VPS/EC2 image

Step 3 : bang some commands

1
2
3
4
5
6
7
8
9
10
11
12
13
14
15
16
17
18
19
20
21
22
23
24
25
26
27
28
29
30
31
32
33
34
35
36
37
38
39
40
41
42
43
44
45
46
47
48
49
50
51
52
53
54
55
56
57
58
59
60
61
62
63
64
65
66
67
68
69
70
71
72
73
74
75
76
77
78
79
- mkdir ~/wordpress
- cd wordpress
- vi docker-compose.yml
paste this into the new docker-compose.yml file and hit save
(replace needed credentials as per your setup needs)
web:
image: wordpress
links:
- mysql
environment:
- WORDPRESS_DB_PASSWORD=(WORDPRESS_DB_PASSWORD)
- VIRTUAL_HOST=(YOUR_DOMAIN_NAME)
ports:
- "127.0.0.1:8081:80"
working_dir: /var/www/html
volumes:
- /wordpress/wp-content/:/var/www/html/wp-content
mysql:
image: mysql:5.7
ports:
- "127.0.0.1:3306:3306"
environment:
- MYSQL_ROOT_PASSWORD=(WORDPRESS_DB_PASSWORD)
- MYSQL_DATABASE=(WORDPRESS_DB_NAME)
phpmyadmin:
image: corbinu/docker-phpmyadmin
links:
- mysql
ports:
- 8080:80
environment:
- MYSQL_USERNAME=root
- MYSQL_ROOT_PASSWORD=(MYSQL_ROOT_PASSWORD)
nginx:
image: jwilder/nginx-proxy
ports:
- 80:80
volumes:
- /var/run/docker.sock:/tmp/docker.sock:ro

Step 4 : Now you have all needed to get the setup start.

just make sure you have docker and docker-compose and docker is running in daemon mode

sudo apt-get install docker docker-compose

Step 5 : The magic commands are

docker-compose build && docker-compose up

once this finishes .. you’ll see lots of logs and you can hit back to see your domain show the wordpress installation page instead of the page not found page.

This shall be it. But you need to get rid of the console and let the setup run

So once you’ve confirmed all is fine. do a Ctrl + C to shut the images down. and then again start using

docker-compose build && docker-compose start

start runs the same stuff in daemonized mode.

Also - you shall understand that what docker did was fetching all the installation necessary material from official images for installing
mysql, nginx and wordpress and phpmyadmin and then installed all those as per your suggested variable data (db name , password etc.) magical, no ?

actually the catch is that you still need to follow where those directories are linked in order to make changes to those directories. example - you’ll need to change permissions for the wp-content in order to copy themes into it. so it’s a short-cut, but you still shall be helped by gaining clarity with directory structure as you move along. But all this saves you from the deadline sword. Doesn’t it ?

Proactivity

Getting Started with Blogging in MarkDown with Hexo

Veröffentlicht am 2016-11-27

Source

In Summary Here you go

1
2
3
4
5
6
7
8
9
10
11
npm install hexo-cli -g
hexo init blog
cd blog
npm install
hexo server

That’s it. Jump to http://localhost:4000 to see your blog running. tweak around _config.yml to spice things up


Pre-Requisites for above to work

  • Have Node v4.4+ & npm v3.x+ installed
  • Have git installed on cli

Check documentation for more info.

Looks Okay ?

Don’t like the look of things ?

  • Change it up. Choose from themes

Begin Writing in MarkDown

Now jump to the project and source/_posts/ folder would have all your posts in MD (markdown format). Preview using any MarkDown editor or use Atom Editor’s awesome preview plugins documentation for MD

Deployment

I prefer github pages (that’s the simplest) However, heroku and openshift portal deployments also possible. For more details jump here

  • npm install hexo-deployer-git --save
  • Edit your _config.yml. Add this
1
2
3
4
5
6
7
8
9
10
deploy:
type: git
repo: <repository url="">
branch: [branch]
message: [message]

You’ll need to create a repo having gh-pages branch on github before deploying

That’s all that is needed. Happy blogging :-)

Proactivity

Getting started with aws lambda

Veröffentlicht am 2016-11-27

Source

IaaS, PaaS, SaaS and now FaaS ?

A Function would probably be the smallest possible unit of execution in any functional natured programming language. A stateless function has existed as a stateless web service for quite some time, and mapping functional logic to REST API endpoints also achieves a similar goal as Web Services. Eventually a URL is mapped to a piece of logic. A FaaS stands for Function as a Service which can be thought of as the new fad. My opinion though is that it’s here to stay. With AWS lambda jumping to the fore and lots of technical setups and solutions already jumping on the bandwagon, newer players like webtasks by Auth0 the offering seems like one that has it’s takers. In simple terms - A FaaS refers to a function deployed as a service (which has features applicable to cloud like elasticity, security, auto-scaling etc.) which is bound to a callable URL and which is stateless in nature. so multiple calls with same inputs result in same behaviour from the logic that runs.

Why it makes sense ?

Not all portions of codebase are equallyt important or equally prominently used. SOme are more critical and everyone travells through them example - authentication and authorization. There are other portions like Advanced Search which are available but not used in each workflow. Obviously it makes sense to have higher availability and security for the more important bits. And if you associate with finances if noone’s using anything, Does it make sense to be having just the server running ? No ! Right ? That’s what FaaS enables to achieve.

AWS Lambda

Any offering from AWS asks for a serious look. This one is my favourite (after EC2).

AWS Lambda lets you run code without provisioning or managing servers. You pay only for the compute time you consume - there is no charge when your code is not running. With Lambda, you can run code for virtually any type of application or backend service - all with zero administration.

That was how AWS describes Lambda

In case you need a good framework for FaaS framework like AWS lambdas, refer to this post - _serverless framework getting started & example_

Beginning your AWS Setup

The best place to head is AWS Documentation. Since It’s an entire topic in itself - I’d not mistake trying to cover that here

  • setup AWS IAM role
    – make sure you select Lambda service access for this role
    – create a new ~/.aws/credentials file (if one is not already present)
    – Put in you access key and security key in there (like below)

    1
    2
    3
    4
    5
    6
    [default]
    aws_access_key_id=XXXXXXXXXXXXXXXXXXXXXXXXXXXX
    aws_secret_access_key=XXXXXXXXXXXXXXXXXXXXXXXXXXXXXXXXXXXX

– Copy the path starting with arn:// (role url) for your newly created role into your lambdaenv.json file in the root directory of the example project. It will look like below.

1
2
3
4
5
6
7
{
"Role" : "arn:aws:iam::XXXXXXXXXX:role/XXXXXXX",
"Region" : "eu-west-1"
}
  • Now the example project has the lambda function logic contained within src/index.js file. Feel free to change it once it is seen working
  • What is now needed is to push the code sitting on your system onto AWS cloud (to be available to be executed as desired, on demand). gulp deploy does that. The gulpfile.js is the gulp file which has a lot of tasks. the deploy one meant for this purpose only(sending code over to AWS lambda infrastructure)
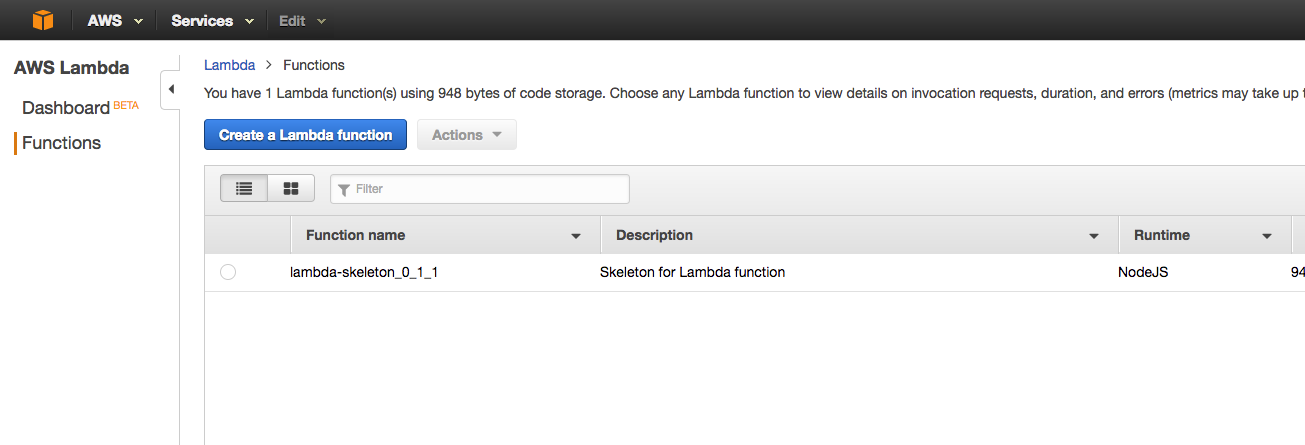
  • Running gulp deploy has done what you wanted. To make sure go to your AWS dev console - You’ll see the function you uploaded available to you. You could infact have created it right from this place also :-). Now you have the choice. Being a developer the way explained is recommended and preferred by/for me.
    AWS Lambda Screen Listing Functions Created

  • Go ahead run the function against test data you can change from this screen. Now your logic is in cloud (Lambda). You can now call this from any mobile app or hook it up with any webhook or any event to be called. Lambda does not care.

In the next part, We’ll look at integrating this with a Riot App runnable on your mobile device or web.

The Code I use to explain the setup

The code I’m using is at github
Feel free to extend the chain

Any Limitations ?

Well, AWS Lambda is pretty flexible and allows you to explore any code capable logic uploaded and running on AWS. However, it expects the functions to be under a specific size

AWS Lambda Deployment Limits

  • Lambda function deployment package size (.zip/.jar file) 50 MB
  • Size of code/dependencies that you can zip into a deployment package (uncompressed zip/jar size) 250 MB
    AWS limitations

More References

Proactivity

Getting Started With Serverless

Veröffentlicht am 2016-11-27

Source

AWS Lambda & Severless

This post covers AWS Lambdas (If you need it)
_aws-lambda getting started & example_


What is Serverless ?

Serverless is an MIT open-source project, actively maintained by a vibrant and engaged community of developers.
Jump Here

Serverless is tragetting a broader vision/concept - to become a framework for different FaaS providers (not just AWS Lambda)

Serverless Framework - Build applications on AWS Lambda, Google CloudFunctions, Azure Functions, AWS Flourish and more

Getting Started with Serverless

Serverless As Defined By Serverless Folks (Here)

The Serverless Framework helps you develop and deploy your AWS Lambda functions, along with the AWS infrastructure resources they require. It’s a CLI that offers structure, automation and best practices out-of-the-box, allowing you to focus on building sophisticated, event-driven, serverless architectures, comprised of Functions and Events.

A few things the Serverless Framework does differently than a normal application Framework are:

  • It manages your code as well as your infrastructure
  • It supports multiple languages (Node.js, Python, Java, and more)
  • It supports FaaS on Azure, AWS lambda and other similar providers
  • Here are the Framework’s main concepts and how they pertain to AWS and Lambda…

For more verbose information on same , This is the best place to lookup. We’d rather focus on building something up below

What Serverless is and what it isn’t ?

  • Serverless is a framework for FaaS providers. It is not a FaaS provider itself
  • It helps organize code and prepare it for deployment onto FaaS infrastructure(like AWS Lambda)

Steps to building with serverless

  • install serverless globally npm i -g serverless
  • install nvm and be on v4.3 of node (supported by AWS lambda at the moment)
  • clone from starter repository - https://github.com/saurshaz/serverless-starter
  • change code as needed, cd lambda
  • test it offline (using serverless-offline plugin). use sls offline
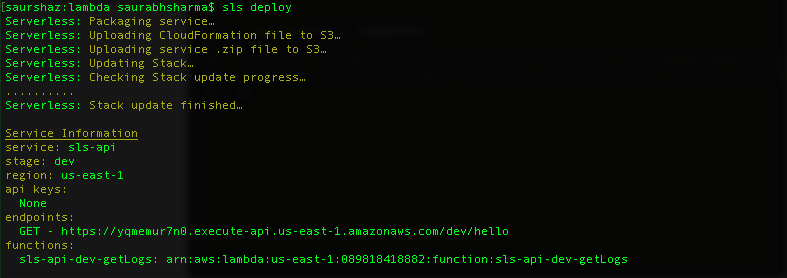
  • deploy the function(s) by doing sls deploy
    deployment using terminal
  • The endpoint URL you see is the one you can connect to by hitting via http
    (remember though that the lambda is invokable not just via tcp/http calls but can be scheduled triggered via sns also)
  • For example, in above - https://yqmemur7n0.execute-api.us-east-1.amazonaws.com/dev/hello is the URL that can be hit

Any Limitations ?

Well, AWS Lambda is pretty flexible and allows you to explore any code capable logic uploaded and running on AWS. However, it expects the functions to be under a specific size

AWS Lambda Deployment Limits

  • Lambda function deployment package size (.zip/.jar file) 50 MB
  • Size of code/dependencies that you can zip into a deployment package (uncompressed zip/jar size) 250 MB
    AWS limitations
Proactivity

Getting Started Using SnS To Send Push Notifications (use SnS for push notifications)

Veröffentlicht am 2016-11-27

Source

Getting started with SNS (use SnS for push notifications)

This post covers an introduction AWS Simple Notification Service (AWS SNS). It will cover (as an example) the was SNS can be used to connect two different lambdas and how one can trigger the execution of the second lambda.

_aws-lambda getting started & example_


What is AWS SNS ?

Best described here as Fully managed and highly scalable push messaging. I have understood(being a developer) as - It is the good oldpub-subfor your AWS infrastructure services. What works for SNS as a lucrative offering is -

  • It is AWS offering
  • It is incredibly cheap for your next app. Your first 1 million Amazon SNS requests per month are free, then it costs $0.50 per 1 million Amazon SNS requests thereafter.
  • Much needed pub-sub glue for different AWS infrastructure services
  • Also usable for Push notifications (we’ll cover this in [SNS part two][3])

Serverless is an MIT open-source project, actively maintained by a vibrant and engaged community of developers.
Jump Here

Serverless is tragetting a broader vision/concept - to become a framework for different FaaS providers (not just AWS Lambda)

Serverless Framework - Build applications on AWS Lambda, Google CloudFunctions, Azure Functions, AWS Flourish and more

Getting Started with Serverless

Serverless As Defined By Serverless Folks (Here)

The Serverless Framework helps you develop and deploy your AWS Lambda functions, along with the AWS infrastructure resources they require. It’s a CLI that offers structure, automation and best practices out-of-the-box, allowing you to focus on building sophisticated, event-driven, serverless architectures, comprised of Functions and Events.

A few things the Serverless Framework does differently than a normal application Framework are:

  • It manages your code as well as your infrastructure
  • It supports multiple languages (Node.js, Python, Java, and more)
  • It supports FaaS on Azure, AWS lambda and other similar providers
  • Here are the Framework’s main concepts and how they pertain to AWS and Lambda…

For more verbose information on same , This is the best place to lookup. We’d rather focus on building something up below

What Serverless is and what it isn’t ?

  • Serverless is a framework for FaaS providers. It is not a FaaS provider itself
  • It helps organize code and prepare it for deployment onto FaaS infrastructure(like AWS Lambda)

Steps to building with serverless

  • install serverless globally npm i -g serverless
  • install nvm and be on v4.3 of node (supported by AWS lambda at the moment)
  • clone from starter repository - https://github.com/saurshaz/serverless-starter
  • change code as needed, cd lambda
  • test it offline (using serverless-offline plugin). use sls offline
  • deploy the function(s) by doing sls deploy
    deployment using terminal
  • The endpoint URL you see is the one you can connect to by hitting via http
    (remember though that the lambda is invokable not just via tcp/http calls but can be scheduled triggered via sns also)
  • For example, in above - https://yqmemur7n0.execute-api.us-east-1.amazonaws.com/dev/hello is the URL that can be hit

Any Limitations ?

Well, AWS Lambda is pretty flexible and allows you to explore any code capable logic uploaded and running on AWS. However, it expects the functions to be under a specific size

AWS Lambda Deployment Limits

  • Lambda function deployment package size (.zip/.jar file) 50 MB
  • Size of code/dependencies that you can zip into a deployment package (uncompressed zip/jar size) 250 MB
    AWS limitations

[3]:

Proactivity

Getting Started Using SnS To Connect Lambdas (use SnS to connect lambdas)

Veröffentlicht am 2016-11-27

Source

This post covers an introduction AWS Simple Notification Service (AWS SNS). It will cover (as an example) the was SNS can be used to connect two different lambdas and how one can trigger the execution of the second lambda.

_aws-lambda getting started & example_


What is AWS SNS ?

Best described here as Fully managed and highly scalable push messaging. I have understood(being a developer) as - It is the good oldpub-subfor your AWS infrastructure services. What works for SNS as a lucrative offering is -

  • It is AWS offering
  • It is incredibly cheap for your next app. Your first 1 million Amazon SNS requests per month are free, then it costs $0.50 per 1 million Amazon SNS requests thereafter.
  • Much needed pub-sub glue for different AWS infrastructure services
  • Also usable for Push notifications (we’ll cover this in [SNS part two][3])

Serverless is an MIT open-source project, actively maintained by a vibrant and engaged community of developers.
AWS Lambda

Serverless is tragetting a broader vision/concept - to become a framework for different FaaS providers (not just AWS Lambda)

Serverless Framework - Build applications on AWS Lambda, Google CloudFunctions, Azure Functions, AWS Flourish and more

For more verbose information on Serverless

The Code I use to explain the setup

The code I’m using is at github
This is mostly work altready done by at
Feel free to extend the chain

Steps to using SNS + AWS Lambdas with serverless

  • install serverless globally npm i -g serverless
    Make sure that you use Serverless v1.(have serverless installed globally)
    Stay on Node version 4.3
  1. Run serverless install --url https://github.com/saurshaz/serverless-sns-lambda-chaining to install the service in your current working directory
  2. Next up cd into the service with cd serverless-sns-lambda-chaining
  3. Run npm install
  4. Copy .env.sample into .env. Replace the ACCOUNT_ID in the .env file with your AWS account id
  5. Deploy with serverless deploy
  6. Invoke the first function via the endpoint (you’ll see the endpoint in terminal, when deploying)
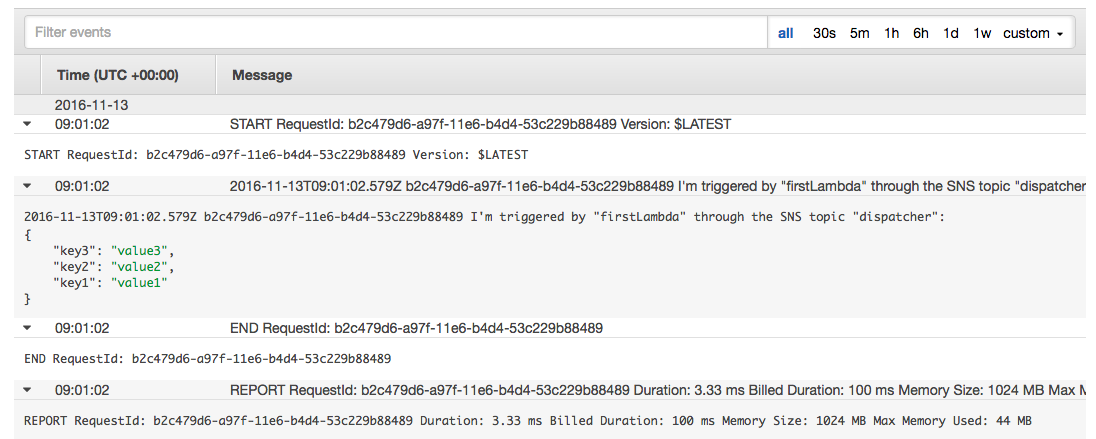
  7. Notice cloudwatch logs to verify second lambda also gets invoked. that happened via SNS

Logs will show something like this - image

Any Limitations ?

Well, AWS Lambda is pretty flexible and allows you to explore any code capable logic uploaded and running on AWS. However, it expects the functions to be under a specific size

AWS Lambda Deployment Limits

  • Lambda function deployment package size (.zip/.jar file) 50 MB
  • Size of code/dependencies that you can zip into a deployment package (uncompressed zip/jar size) 250 MB
    AWS limitations

[3]:

Proactivity

Create Tabular Views Fast

Veröffentlicht am 2016-11-27

Source

Prerequisites

This post covers RiotJS (You shall see this if not aware of what RiotJS is)
_RiotJS :: A Brief Introduction_

What is this ?

A riot based component to build grid based UIs or tabular views in a faster and declarative fashion.

In my last project I was faced with the boring task of creating over 20 grids (with different data) at different pages of the app. I thought of making the boring task a little less boring by producing this component (powered by footable and RiotJS)

  • Check out Getting Started with RiotJS for understanding how RiotJS components work.
  • FooTable is a small and sweet grid rendering library (others are jqgrid, datatables, slickgrid)

What riot-fast-tables does ?

It renders grid controls based on the configuration you provide into it. It is made out to be 100% declarative to produce similar looking tables (across your project pages). you can customize the look and feel for the tables by tweaking the component markup itself.

The Code for the Example I used

The code I’m using is at github
Feel free to extend the chain

How it works , configuration object ?

The configuration looks somewhat like below

1
2
3
4
5
6
7
8
9
10
11
12
13
14
15
16
17
18
19
20
21
22
23
24
25
26
27
28
29
30
31
32
33
34
35
36
37
38
39
40
41
42
43
44
45
46
47
48
49
50
51
52
53
54
55
56
57
58
59
60
61
62
63
64
{
pagesize:"2",
headdata:[
{class:"text-center", label:"Name"},
{class:"text-center", label:"Amount"},
{class:"text-center", label:"Client"},
{class:"text-center", label:"Due Date"},
{class:"text-center", label:"Status"},
{class:"text-center", label:"Actions"}
],
tabledata: [
{
corp:{ name: 'Mike Gatting' },
amount: '500',
client:{ name: 'Andrew Slater' },
due_date: new Date(),
status: 'active'
},
{
corp:{ name: 'Ravish Kumar' },
amount: '300',
client:{ name: 'Arnab Goswami' },
due_date: new Date(),
status: 'active'
}
],
rowitems: [{value:'corp.name'},{value:'amount', format: 'currency'},{value:'client.name'},{value:'due_date', format: 'date', pattern: 'DD-MMM-YY' },{value:'status'}],
rowactions: [
{onclick:this.action_one,iconclass:"fa-envelope"},
{onclick:this.action_two,iconclass:"fa-eye"}
]
}

Each part of the configuration described below -

  • pagesize : the number of rows visible on each page
  • headdata : An array of objects containing each header column information. class that can be applied to each heading column, and label that can can be the header column text. this array size shall equal the number of columns visible.
  • tabledata : An array of JSON objects each representing a row-data. An example of one row-item is

    1
    2
    3
    4
    5
    6
    7
    8
    9
    10
    11
    12
    13
    14
    {
    corp:{ name: 'Mike Gatting' },
    amount: '500',
    client:{ name: 'Andrew Slater' },
    due_date: new Date(),
    status: 'active'
    }

here, the actual data present shall be supplied. This is worked upon by using the rowitems data to fetch out and render each row in final output.

  • rowitems : This consists an array of JSON objects each of which represnts what value shall be fetched out of the original JSON object (each row object from tabledata original array)

A valid value looks something like

- - {value:'corp.name'}
    which means fetch and render from path `<original_obj>.corp.name`
- - {value:'amount', format: 'currency'}
    which means fetch and render `<original_obj>.amount` but before rendering format the string as `currency`
- - {value:'u_date', format: 'date' , pattern: 'DD-MMM-YY' }
    which means fetch and render `<original_obj>.u_date` but before rendering format the value as `date` using the supplied pattern
  • rowactions : This consists an array of JSON objects each of which represents an action possible upon click of the icon presented. The icon to be rendered (usin font-awesome icons is also specified in configuration). The array is of JSON objects like -
1
2
3
{onclick:this.action_one,iconclass:"fa-envelope"},

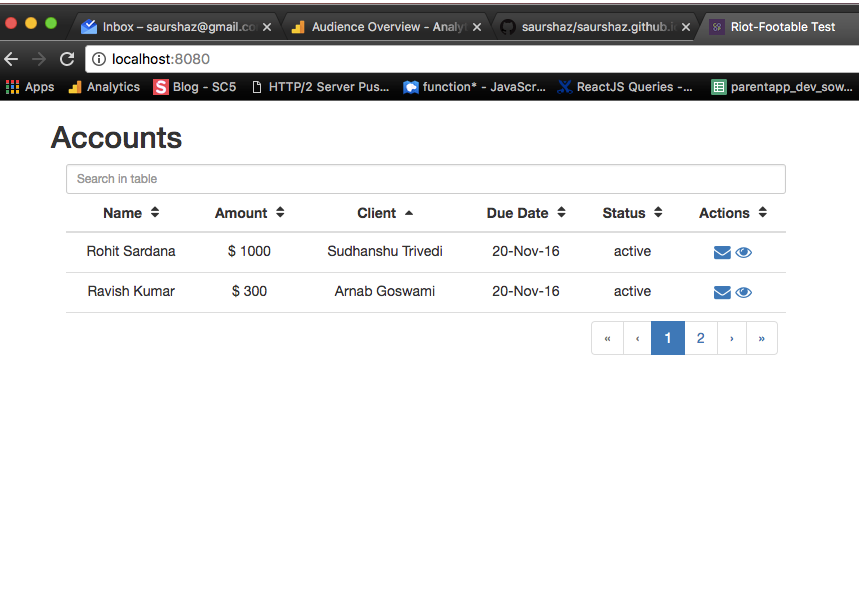
Here, action_one would be a function present in the current context. and iconclass represents to the style applied on the action-button. Look below for what rendered looks like -

table looks like this

The style is unusual, right ?

Yes it is imperatively building the grid. and this style will be slower than actual data grids (if data is already available). However this is a good fit for certain use-cases. where you want to abstract tabular rendering and change views at runtime. or places where developer productivity is more important and fastest grid is not the end goal.

Proactivity

RiotJS, A Brief Description

Veröffentlicht am 2016-11-27

What is RiotJS ?

Small Answer

Another front-end framework for building your view layer (just like React and Polymer)

More Comprehensive Answer

So, if you are a web developer working on front-end - In all probabilty - there are way too many frameworks you would’ve seen (or even worked upon)
There are MVVM/MVC frameworks like BackboneJS, Knockout, spine, Angular, VueJS and many others.

Most of these manage the entire part of the front-end stack - The Javascript logic as well as the templating and routing (Angular does a bit more, in fact a little too much for certain pro’s likings)

However, there are a second type of frameworks (those that focus only on view layer management)
Off late have appeared a components based views building ideology with web components and frameworks like Polymer endorsed that concept beautifully.

Then came the revolution with Facebook taking an aggressive open-source rout starting with React. Why this is termed as a revolution is because of the community & adoption rates it has built in such a short period. The philosophy with React too has been modular view building. However the approach has differed with the DOM manipulations always going through Virtual-DOM.

So, Riot is again a view managing framework that builds on concepts popularised by both Polymer and React.
It takes a midway between the Polymer and React paths.
It follows a more polymer component like syntax (which is music to eyes full of JSX experience).
But for DOM manipulations it goes a Virtual DOM route(like React) with a different diffing engine(open-sourced) and much smaller than React’s.

How it’s different from others (pros/cons)

Why it’s a good bet ?

  • It’s the simplest to start with. Small learning curve(compared to React, Polymer)
  • It brings no baggage. It is pure HTML and JS and you can use whatever you wish (just like basic HTML/JS code)
  • Has a good and active community support https://gitter.im/riot/riot
  • Virtual DOM makes Absolutely the smallest possible amount of DOM updates and reflows
    supports Server-side rendering of custom tags for universal (isomorphic) applications
  • No proprietary event system
  • Create tags with ES6, Typescript, CoffeeScript, Jade, LiveScript or any pre-processor you want

What’s not so good ?

  • The diffing leaves much desired in terms of performance (when compared to React). This affects overall performances in some specific scenarios.(like listing and an item changing)
    Having said that - v3.0 is having plenty of focus on optimizations and needs to be examined for changes in that.

Can’t follow. What is RiotJS specifically ?

Simply put, it’s a framework that makes it possible to build your view layer in a block by block fashion, where you can build different reusable components and build views composed of them.
(just like html markup has header, body, footer - riot extends that to any level of developer’s desire). Look at the github repo code (below) for a better visualization.

RiotJS as explained by community

A starter course on Youtube

The Code I use to explain the setup

The code I’m using is at github
Feel free to extend the chain

What does a Riot component look like ?

It can be described in a tag file. Webpack does the magic of reading the tag file material and compiling as a riot component. You can now use this component in any HTML file.

1
2
3
4
5
6
7
8
9
10
11
12
13
14
15
16
17
18
19
20
21
22
23
24
25
26
27
28
29
30
31
32
33
34
35
36
37
38
39
40
41
42
'use strict';
// use any library or custom code
const g = require('../lib/gravatar')
<gravatar>
<!-- use events binding just like normal HTML markup -->
<!-- use style classes just like normal HTML markup -->
<a onclick="{handleClick}" target="_blank" class="meet">
<img src={url}
width="{this.opts.size || 200}"
height="{this.opts.size || 200}">
</a>
<pre>
<!-- binding data from script in markup -->
{this.opts.email || this.email}
</pre>
<style>
.meet {
display: inline-block;
padding: 1em;
text-align: center;
}
.meet img {
background-color: rgb(211, 211, 211);
border: 5px solid rgb(255, 255, 255);
border-radius: 100%;
box-shadow: rgba(0, 0, 0, 0.5) 0px 3px 7px;
margin: auto;
}
</style>
<script>
this.handleClick = (e) => {
alert('handled a click event')
}
this.on('mount', () => {
this.email = this.opts.email || 'saurshaz@gmail.com'
const options = {size: this.opts.size || 200, rating: "pg", backup: "retro", secure: true}
this.url = g.gravatar(this.email, options)
this.update()
})
</script>
</gravatar>

Presented here is a gravatar component built using RiotJS
Superpowers covered in this small snippet above (if you look carefully) are :-

use any library or custom code (using a custom code gravatar.js here by simply importing)
use events binding just like normal HTML markup (onclick in markup and this.<function_name> in script section)
use style classes just like normal HTML markup (good old class=<classname> syntax)
binding data from script in markup (look at this.url and this.email in script part)
scoped style (good old

saurshaz

saurshaz

Prior to Future happens

9 Artikel
GitHub Twitter
  • Blog
  • GitHub
© 2016 saurshaz
Erstellt mit Hexo
Theme - NexT.Muse